Sunday, December 19, 2010

Blueberry Muffins

I ended up with about 2 cups of leftover blueberries from earlier in the week so I decided to make some blueberry muffins Saturday morning using the following recipe:

4 eggs
2 cups white sugar
1 cup vegetable oil
1 teaspoon vanilla extract
4 cups all-purpose flour
1 teaspoon salt
1 teaspoon baking soda
2 cups sour cream
2 cups blueberries

This recipe makes 24 regular-sized muffins or 12 jumbo muffins.
Preheat oven to 400 degrees.
In a large bowl beat eggs, gradually add sugar while beating.  Continue beating while slowly pouring in the oil, and then vanilla.  In a separate bowl, stir together flour, salt, and baking soda.
Mix in the sour cream and then the dry ingredients.  When thoroughly mixed gently fold in the blueberries.  Scoop the batter into prepared muffin tins (greased, or lined with paper cups).
Bake for 20 minutes for standard sized muffins, 30 for jumbo.
 
Jumbo Muffins!


Later that night I got together with some friends and we made sushi.  Here are a few pics from the evening.


Friday, December 17, 2010

Of Sourdough and Cheesy Braids

So my first sourdough from my own starter was a success!  My only setbacks throughout all of this was the amount of time every stage of it needs to rise and proof.  The starter itself was ready (a very loose usage of the word ready, more on that later) after 6 days.  From there it needed another 6 hours after I mixed it into a biga before it sat in the fridge overnight.  Then, when I mixed a part of that into a firm starter it took another 4 hours on the counter before another night in the fridge.  The next day I mixed the final dough but as usual, 4 hours of counter time and another night in the fridge.  Fortunately, I was randomly woke up at almost 2am the other day to preheat the oven in time and bake the 2 loaves before work!  

The thing I find strangest about the whole sourdough experience is that it doesn't smell like sourdough until it's completely finished.  But the wait was well worth it!  I have another firm starter proofing right now so I should have another loaf on Sunday.  I have some cool ideas on how to incorporate my dutch ovens into finishing this next one.

They were a little smaller than I expected.  As mentioned earlier calling the dough "ready" at any point was a bit of a misuse of the word.  From the beginning it took longer at each step than I had read it would.  I think that part of that was I typically keep it colder in the house.  With it being winter and all, it was in the mid 60s in the kitchen most of the time.  This would hinder the wild yeast growth.  Also, my keen-eyed mother pointed out I was using plastic to grow my starter instead of glass and that may have hindered growth as well.  When I return from Japan I am going to start all over again and see what I can come up with.

My first two loaves of sourdough:


Like my first bread posted here, it was a little dense.  However, it was incredibly chewy and had a wonderful sourdough flavor/aroma!

That same afternoon at work Charles had brought in some homemade pulled pork, baked beans, and coleslaw.  I offered to bring in my dutch ovens and cook some bread on charcoal!  This bread was made from the recipe found in The Full Circle Dutch Oven Cookbook.  One of my absolute favorite Dutch Oven books.  I had to pay very close attention to temperature and heat on the dutch ovens.  This was only the second time I've baked bread on charcoal and several burned a batch of rolls on the bottom the last time.  Fortunately diligence paid off and they turned out PERFECT!  I only wish I snapped a crumb shot before it was gone.

When dividing the dough I got a little distracted and miscut a few pieces.  This is the smaller loaf.


 The larger one took a few more minutes to hit 200 degrees internally.


Both were cooked in 12" Dutch Ovens, the larger loaf had to go in my 12" deep.


Wednesday, December 15, 2010

Ciabatta and Foccacia

I made these breads last Friday.  The foccacia was a snack for Jackie's wine tour birthday party and the ciabatta was for the hell of it.  Both of these doughs were incredibly wet.  The goal is to get nice big holes in the crumb with a crispy crust.  I really only succeeded at this in the focaccia.  The ciabatta had fantastic flavor, but it didn't have the large holes I desired.  Next time I try making this I'm going to add more water and some olive oil.

Using the poolish I started on Wednesday I mixed the rest of the dough for the ciabatta.  This time the dough really wasn't kneaded in the traditional sense.  Instead it uses the stretch and fold method which requires a little extra time for it to rest in between stretches and folds:

After it was done with the stretch and folds I had to setup a makeshift couche to keep the bread shaped and in place.


The dough has rested and is ready for the oven.


End result!


The focaccia also took a long time to prepare.  I did not plan ahead and did not make a poolish to start so I had to use a straight dough method.  The dough was incredibly wet and poured almost like a super thick batter.  It spent almost 30 minutes in the mixer mixing and kneading.  The consistency was about equal to that of salt water taffy in the end.

After almost 5 hours of rising this was the dough.  It was very stretchy and shiny.


It poured right out onto the sheet pan.  I had to let it rest 10 minutes in between trying to stretch it out to fill the hole pan.  The difficult part was not losing all the precious air bubbles!


A mere 15 minutes of baking!


Sliced and packaged.


Wednesday, December 8, 2010

Bread Wednesday

Today was a busy day for the mixer.  This morning started out with my first sourdough starter culture.  I should be ready to bake my first sourdough breads next Monday and Tuesday.  After the mother seed is finished I will post the entire process.  Here's what it looks like for now:


Next I started a poolish for some Ciabatta bread I am going to bake on Friday.  A poolish is a type of preferment that is able to sit in the fridge for a few days before you make the dough to get the most flavor.  Its got the consistency of a thick pancake batter:


Next up I baked a few loaves for work tomorrow.  First I made some flaxseed bread for Patrick.  I can't wait to tear into this!


I also decided to make some cheesy braids for lunch at work tomorrow.  I thought somebody else was cooking some food but it turns out I was mistaken.  All for the better I suppose.  I kneaded this bread in the mixer and it totally pulverized the cheese in the dough.  Now its just yellow bread, and a little over done.  Oh well.

Sunday, December 5, 2010

Heart of Wheat

Last night I finished a Heart of Wheat bread.  The recipe again coming from The Bread Bible.  This bread is close to the first one I baked a few days ago, but has a few tablespoons of Wheat Germ (not toasted) mixed in.  As with most breads in this book it uses a sponge preferment and needs to sit for 1-4 hours at room temperature.  I had to run out and wouldn't be home for at least 6-7 hours so I stuck it in the fridge which supposedly you are able to do.  I've never put activated yeast back in the fridge for fear of killing off the yeasties.  When I got home I took out the mixing bowl and set it in a slightly warm oven to get back to room temp before I began to mix and knead.  While kneading the dough was a little wetter than I had anticipated and it made it hard to handle,  I probably should have mixed in a little extra flour but decided to stick it out.

It took a little longer to begin rising as it was still cold from resting in the fridge.  Maybe a half hour extra time, so not too bad.  I'm still pretty bad at trying to shape these things and this dough being on the wet side did not help much, I had to handle it much more than I should have.  I'm also still very bad at scoring them!

The results were fantastic!  The crust was super crisp and had a nice golden brown color with random splotches of light and dark.  The crumb was very fluffy and moist, but not crumbly.  The color was much darker than the previous breads I've made due to the added wheat germ.  The wheat germ also gave it a very strong wheat flavor.  Dipped in some olive oil and balsamic vinegar, it turned into a great midnight snack. 


Thursday, December 2, 2010

Cinnamon Raisin Swirl

Per Mike's suggestion I made a Cinnamon Raisin Swirl loaf today.  I followed the recipe from The Bread Bible.  This was my first time using a sponge preferment so I was pretty excited.  A preferment allows the flavors to develop a little further before the dough is actually mixed.

The mixed sponge


Covered in the rest of the dry ingredients


2 hours later you can see the sponge bubble and poke through the flour cover.  You can let this go for up to 4 hours in room temperature, but I had no intention on staying up until 2am today.


After I mixed and kneaded this took a good 3 1/2 hours to rise, spending some time in the fridge as well to firm up for rolling.  Once the dough is split in two and stretched out I used an egg wash and sprinkled a cinnamon-sugar mixture over it and rolled them up.  My hands were pretty messy so again, no pictures.  Another two hours of rising in the pan and they were ready to be popped in the oven.  Unfortunately I didn't get all of the air bubbles out so there will be a few pockets in this batch.  Better luck next time.

One last rise


Results


Holy crap was this good!  Very sweet and chewy and the crust was extra crispy!  Like I mentioned before I did not get all of the air bubbles out before I rolled it so there are some pretty big pockets.  But as I found out today, those air pockets make great butter holders!  The flavor of the bread itself was masked by the raisins and cinnamon like I thought, but its still a great flavor.  Everything went better than expected even though they took 7 hours!

Another From Yesterday

I made this one last night as well but didn't have a chance to post it.  This was the same recipe from the first Whole Wheat attempt, but I just stuck to regular bread flour this time (and the appropriate amount of salt).

I made a double batch following this recipe from The Fresh Loaf's second lesson:

2 cups all-purpose enriched unbleached flour
1 cup bread flour
1 teaspoon yeast
1 teaspoon salt
1/8 cup sugar
1 cup warm milk
2 tablespoons butter
1/4 - 1/2 cup lukewarm water

I had some time to kill so I used active dry yeast and gave it 10 minutes to bloom.  I also had to stick to 3 cups of bread flour instead of AP.  I decided to let the mixer do the work for me for this loaf.  I tossed everything in and let it go to town for 15 minutes.  I was worried initially because the dough was very lumpy in the beginning, but it smoothed out after a bit.  

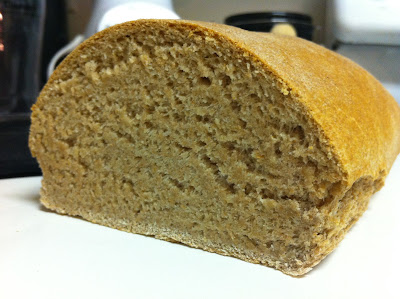
This loaf came out pretty nice.  I'm still not good at scoring the bread yet, I need to get some razor blades.  The bottom also got stuck to the baking sheet in a few spots so I lost a little bit of the crust.  Thankfully I was the only one that noticed!

This loaf was much softer than the other one I made yesterday.  The crumb was very soft and not as chewey.  The crust came out very crisp and you can see flakes of it coming off as it cooled!

The crust on this one is a little darker from the sugar carmelizing.


Crumb Shot


Paninis at work today


Wednesday, December 1, 2010

Starting Over


Second Loaf: Wednesday, December 1, 2010
I decided to go back to what The Fresh Loaf's lesson uses as their "starter" loaf of bread before continuing with whole wheat or anything else crazy.  The recipe is about as simple as it gets:
3 cups flour
2 teaspoons salt
2 teaspoons instant yeast
1 1/8 cup water
I mixed all of the ingredients (I used the Kitchen Aid this time) for about a minute until a ball formed.  I let it rest for 20 minutes then came back and kneaded it by hand for 10 and set it to rise.  This one rose much better than yesterday’s loaf, which I determined had too much salt in it and that's what killed the yeast. 
I shaped it after 90 minutes and let it rest another hour or so.  I had to run an errand when it was time to put the loaf in so I had to set the timer to turn off the oven.  I set it for 35 minutes so residual heat would finish the baking until I got back.  
I was a little nervous setting the oven and leaving.  But as usual, I had nothing to worry about.  The crust was a nice gold color and the crumb was nice and chewy.  Hopefully some lasts until the morning for some breakfast! 


I still used kosher salt with this recipe...I should really go to the store.

The Beginning: A First Attempt

I've made a few breads in the past, but for the sake of continuity I am going to call this loaf my first attempt.  After recently purchasing Levy Rose Beranbaum's and much inspiration from The Fresh Loaf, I decided to start documenting my breads, expanding off of their basic recipes...for now.


First loaf: Tuesday, November 30, 2010
2 cups whole wheat flour
1 cup bread flour
1 teaspoon instant yeast
2 teaspoons kosher salt
1/8 cup sugar
1 cup warm milk
2 tablespoons butter
1/4 - 1/2 cup lukewarm water
I mixed all ingredients by hand for about 1-2 minutes and let the dough autolyse for 20 minutes.  I then kneaded the dough by hand for 10 minutes.  I reserved ¼ cup of wheat flour for kneading the dough. After 6-7 minutes I didn’t need to sprinkle any more, it became not sticky anymore
I set it aside to rise for 90 minutes or so, but to my dismay it had not risen much, if at all.  I'm not sure what my problem is at this point.  I shaped and scored the dough and it is in the oven at 350.  Added a cup of water to a pan to steam.
Results:
It was done after about 30 minutes.  I think it baked faster because it was a bit smaller in size.  It also split on the sides; I need to figure out how to score these better.  The crust was nice and crispy but tasted a little salty.  I doubled the amount of salt since I used kosher and that was recommended.  I really should have stuck to the baseline recipe with regular salt and all bread flour first.  The crumb was very moist but overall the bread was a little dense.