With my roommate Eugene's birthday party coming up I really wanted to bake him a cake. I've been thinking a lot about red velvet lately and figured this was a perfect time to tackle it. I started out with a modified version of a cupcake recipe from an episode of Bobby Flay's Throwdown
here.
Cake:
4 1/2 cups all-purpose flour
2 teaspoons baking soda
2 teaspoons salt
1/8 cup unsweetened cocoa powder
2 1/4 cups vegetable oil
3 1/2 cups granulated sugar
2 cups buttermilk
4 1/2 eggs
3 tablespoons red food coloring
3 teaspoons red food coloring
2 teaspoons vinegar (white or apple cider can both work)
2 teaspoons vanilla extract
1/4 cup water
Cream Cheese Frosting:
2 lbs cream cheese, room temperature
1 1/4 lbs butter, room temperature
2 1/2 lbs powdered sugar, sifted
1 1/4 tablespoons vanilla extract
Preheat oven 350 degrees F.
Sift together flour, baking soda, salt, and cocoa powder into a bowl and set aside.
In a mixer fitted with paddle attachment, mix oil, sugar, and buttermilk until combined. Add eggs, food coloring, vinegar, vanilla and water and mix well. Add the dry ingredients a little bit at a time and mix on low, scraping down sides occasionally, and mix until just combined. Be sure not to over mix, or the batter will come out tough.
I used 2 10" springform pans to bake the cake in, splitting the batter evenly between the two pans. Bake the cakes for 40-50 minutes at 350 degrees F or until a toothpick comes out clean. Remove the cakes from the pans and let them cool.
*This cake was going to be 4 layers so I had to make the cake portion of the recipe twice. The amount of frosting I made worked for the entire cake so no need to scale it if you are making a cake as big as mine.
For the cream cheese frosting:. Whip the butter and cream cheese together in a mixer fitted with a paddle attachment until creamed. Gradually add powdered sugar to the mixture and scrape down the bowl as needed. Add the vanilla and mix until combined. The frosting can be used right away or stored in the fridge for a week.
On the test batch of cupcakes I did with this recipe I had WAY too much cocoa powder. The batch was roughly half the size of the recipe listed above but I used almost double the cocoa powder. OOPS! The flavor wasn't exactly bitter, but the abundance of cocoa washed out a lot of the flavor of the cake.
Suddenly: Cupcakes!
Decorations courtesy of Elana!
When I started the cakes on Friday morning. I ran into one problem that I didn't really think about when planning my day. Cooling time! The first two cake layers had enough time to cool to get started. However, by the time I added the 4th layer, it was still too warm and ended up melting some of the frosting and split in half. Unfortunately I had to trash the top layer and stick with three. At 10" across and each cake being 1 1/2" high, there was still plenty of cake to go around! Again, 1/8 of a cup of cocoa powder gave this cake a chocolaty taste without making the cake bland or bitter.
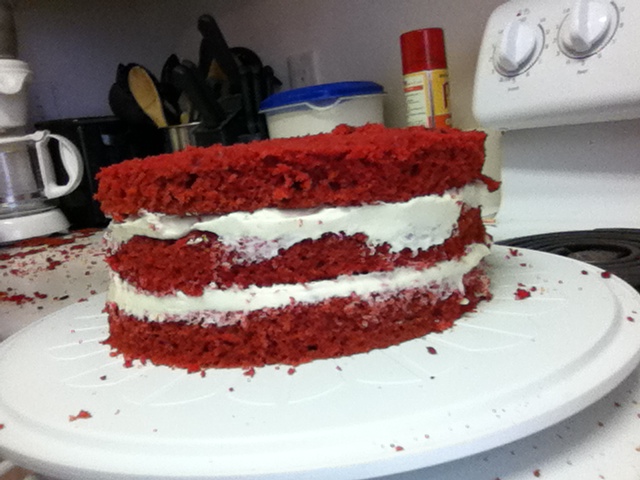
The first two layers:
This was before the layer 4 disaster. Pics were scarce after this due to frustration!
Completed!
I used crumbs from the scrap cake to decorate. It covered up the inconsistencies of my icing job well!
I think the biggest lesson learned is to allow more time to cool. I'm going to try another cake sometime soon, this time making it a 2 day process. Allowing the cake to sit in the fridge overnight should do the trick. Watching that top layer slide off was almost heartbreaking!


No comments:
Post a Comment